In domain environment its really good advantage that administrator can use group policies to apply and control the network. It can be security policies, customizations to system and lot more. There are main reasons why should go with group policies.
1) Centrally Maintain – the settings only need to be configured in active directory and it can apply for whole network without configuring individual PC. Its apply in the domain level.
2) Can Prevent users from changing sensitive settings – some users may change settings like firewall, antivirus and proxy settings. Using these policies can prevent users changing this kind of settings.
3) Rules can be apply for users or Computers – using group policies it gives opportunity to apply rules in PC level or User level. PC rules will be effect registry etc. and user rules will apply for any pc he login in network.
4) Users will not able to bypass the rules or edit them – without permissions users hard to change these policies in user level. Its hard to bypass as well. So its more secure.
5) No changes need if new users or computers added – in client side it do not need any changes to do to apply these rules. As soon as computer added to domain it will get all these rules applied.
6) Easy to Configure – its comes with lot of predefined rules. So as administrator it’s easy to get done what you need with enabling and disabling those predefined rules.
7) Even can apply rules based on operating systems versions – some time rules can cause issues in some version of operating systems. So in some rules you can configure only apply them if client PC run with particular windows version. For ex- you can define rule to accept remote desktop connection if client pc runs with windows xp sp2.
Let’s see how we can create group policies practically. According to the requirement we can have some group policies which will be apply for entire environment including parent and child (sub) domains and some are only apply to the child domains (sub). Let’s start with the policies which will be applying to whole environment.
I will be creating these policies from the primary domain controller.
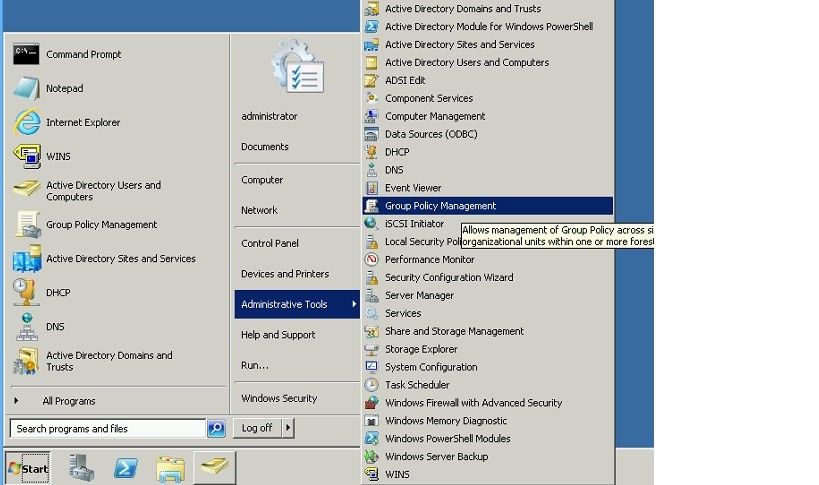
To open the Group policy editor start > administrative tools > group policy management
It will load up the “Group Policy Management” interface.
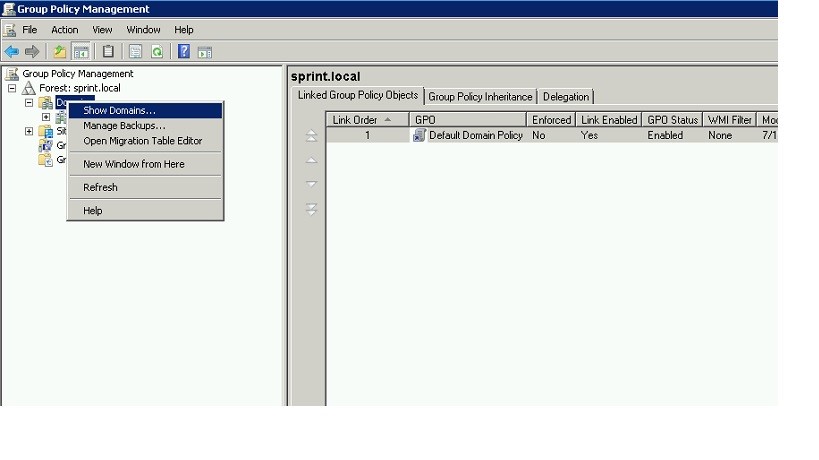
Since we need to apply/create group policies for sub domains (child domains) we can add those domains to same window which will make the process easy. To do that right clicks on the “domains” and click on show domains.
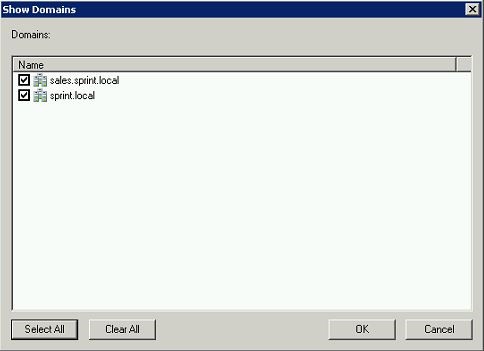
It will load up the available domains.
In here I have only one child domain setup for demo purpose. Click on “Select all” and click ok to continue.
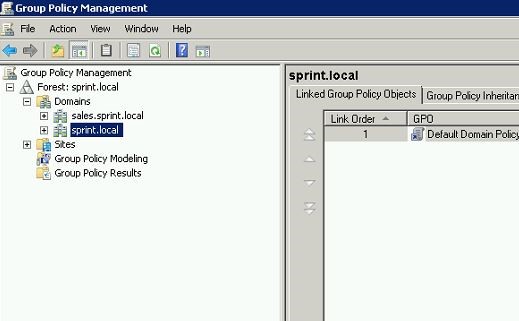
It will list down the sub domain ( child domain ) in same interface as below.
In here I will be setting up a common group policy which will be including all command policies settings for entire network including parent and child domains.
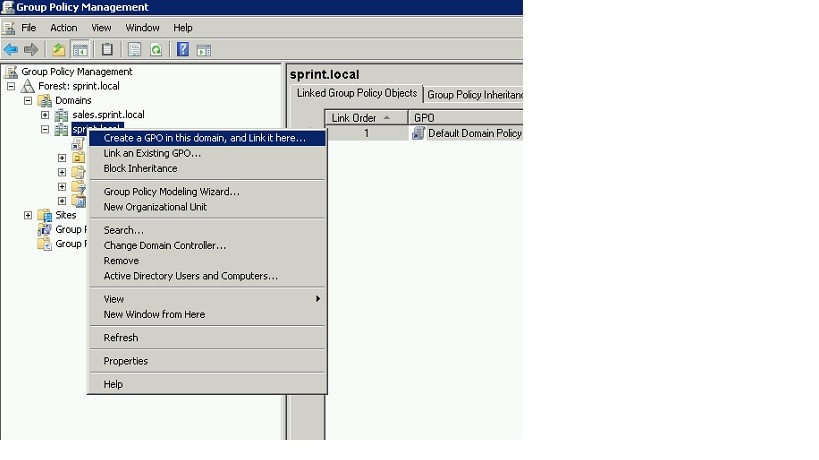
To do that expand the ”sprint.local” tree and then right click on it to select option “Create GPO in this domain and link it here”.
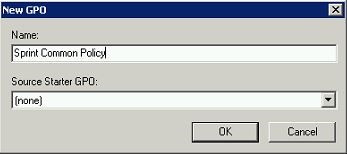
It will open up window to define new group policy name etc. here I choose “Sprint Common Policy” as the name. click ok to continue.
There is a reason we create the GPO under here. Because then it will be inherit to all the Organization Units by default as it do like the Default Domain Policy.
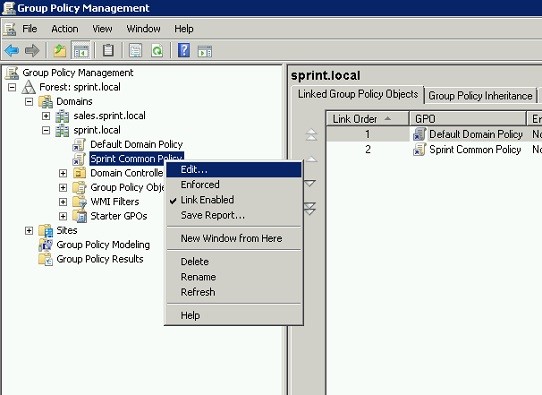
Once it done right click on the new policy and click on edit.
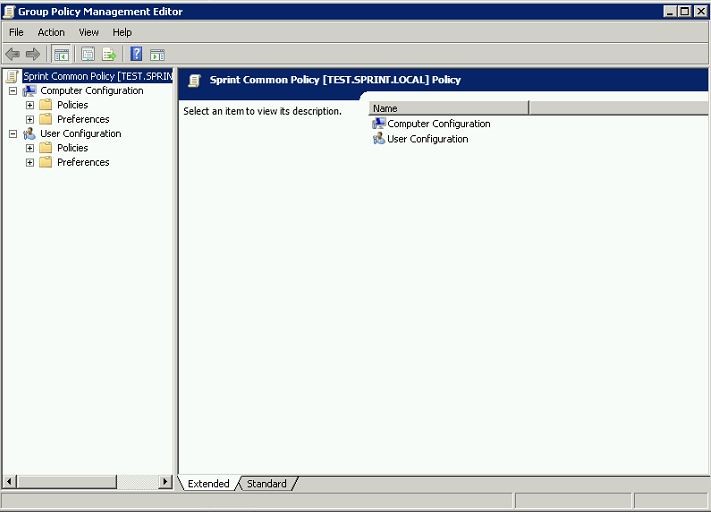
It will open up the window which will give opportunity to edit the policy settings.
Strong Password Policy
When deal with computers it’s really important to consider about data safety. Some time you may be lost your laptop on somewhere and someone may be getting in to important data on it that have value. May be someone in office will steal some confidential data you have in your computer or may be even 3rd party. Other than that there is lot of hackers out there trying to hack in to corporate network and gain access to data. So its became really important to consider about computer data security. In any computer system very basic security precaution for this kind of things is to use strong password on your computer logins. Some people we can see even in offices that use very poor passwords for example – date of birth, 123456, abc etc. so these kind of passwords easy to hack and gain access to computer data. With complex or strong password its preventing the possibility to break in to your computer. In Active directory environment this can define by group policy to use strong passwords on their computers. But the same thing can do in a standalone computer.
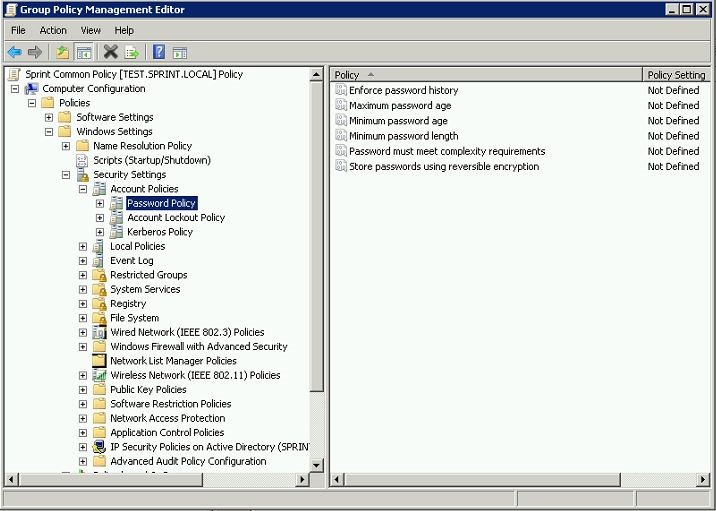
To open this policy location first load up the group policy edit window as described and then go to Computer Configuration > Policies > Windows Settings > Security Settings > Account Policies > Password Policy
This is the location that can configure password policy in computer. To configure this user need to be login with an account that has administrator privileges. The important of this is this policy will apply to all accounts in that computer. So it’s easy to manage.
When we talk about complex password it should be contain Upper case characters, lower case characters, numbers, and symbols. Typically it should be at least 7 characters long.
When implement strong password policy it’s important to discuss with other users as well in organization. Because a complex password means even for users it will be hard to remember. So some people get used to write down the password on paper and keep it on desk. So it’s easy to discover for someone else and gain access to computers easily. So it’s better to discuss and avoid those kinds of issues as well.
Let’s go with each of the options that available in this policy
Enforce Password History
This policy setting means it will determine the number of unique passwords needs to be used before reuse an old password again. Some users always use the same password for long time. It also security risk so administrator can configure this and prevent that. In domain controller by default its set to password 24. Its better at least to have this set to 10 or upper
Maximum Password Age
This policy setting will decide the validity period of a password before it needs to be change. The value will be the number of days. So after that period the computer will ask user to change the password at the log on. The default value for this is 42 days. It’s better if this can be keep for 30 days’ time.
Minimum Password Age
This policy setting controls the number of days that user must pass before he changing the computer password. The default value for this is 1day. The other thing is if you enabling enforce password history setting this value must be set greater than 0. And also this value should be below than maximum password age value.
Minimum Password Length
This setting controls the number of minimum characters that should be in a password. Its better if can keep this between 7-14
Password must meet complexity requirements
This policy setting determines the complexity of the new password. If this is enabled it should meet the following minimum requirements
• Password cannot contain user name or part of user full name that exceed consecutive two characters.
• Password must be at least 6 characters ( this will change if minimum password length policy setting is specified )
• Password must have at least 3 of following
• English uppercase characters
• English lowercase characters
• Base 10 digits (0-9)
• Non-alphanumeric characters
Store passwords using reversible encryption
This policy determines whether passwords need to be store with reversible encryption. It’s important if some application need knowledge of the user’s passwords.
With these settings can apply a complex password policy to system. After configure this need to be log off and log back in to apply changes.
With above settings I have decided to go with following settings
|
Rule |
Settings |
|
Enforce Password History |
24 |
|
Maximum Password Age |
30 days |
|
Minimum Password Age |
1 Day |
|
Minimum Password Length |
8 Characters |
|
Password must meet complexity requirements |
Enabled |
Control Client Firewall Settings
This is another good setting that we can use group policy to configure for users. Sometime in network users disabling firewall, modifying them as they wish etc. its actually security risk for organization to go with different level of firewall settings. Using this group policy easily can control the user firewall settings and they will not be able to modify it in there ends.
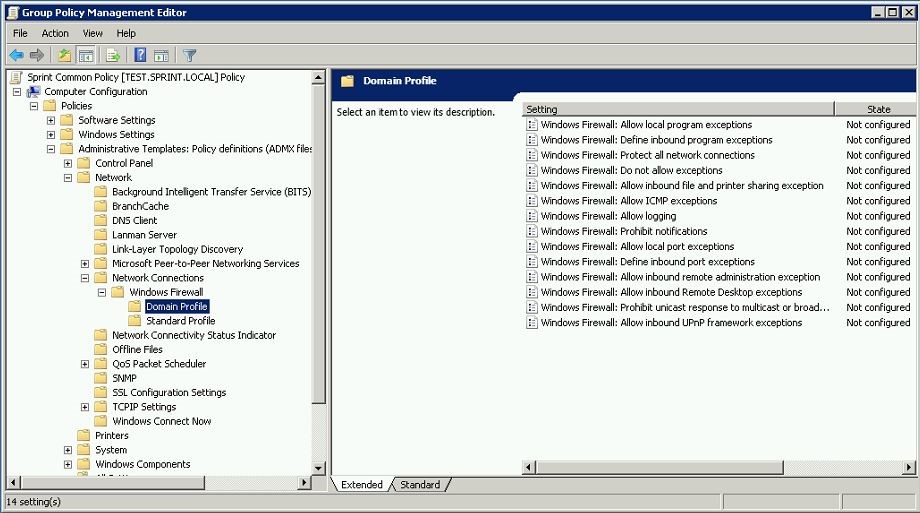
To enable this policy first need to goto group policy editor window then Computer Configuration > Policies > Administrative Templates > Network Connections > Windows Firewall > Domain Profile
Let’s see some of these rules and what can control with it.
Windows Firewall: Protect all network connections
This is the rule that can enable the firewall in the system. Enabling this rule users will not be able to disable it in there end.
Windows Firewall: Do not allow exceptions
Using this rule it will drop all the other traffic except the expected traffic.
Windows Firewall: Define inbound program exceptions
In this rule can define the programs that need exception in firewall traffic blocking. In here can specify the program paths.
Windows Firewall: Allow local program exceptions
Some time there can be local programs in computers that need to allow. Enabling this it allow administrator to allow local programs in firewall exception list.
Windows Firewall: Allow inbound remote administration exception
This enables to remotely administrate the firewall settings using Microsoft Management Console (MMC) and Windows Management Instrumentation (WMI). With this rule can define the ip address that need to be allowed.
Windows Firewall: Allow inbound file and print sharing exception
This allows the print and sharing service exception in the computers.
Windows Firewall: Allow ICMP exceptions
These give opportunities to define what kind of ICMP messages are allowed.
Windows Firewall: Allow inbound Remote Desktop exception
This allows the traffic for remote desktop connections.
Windows Firewall: Allow inbound UPnP framework exception
This allows the traffic from UPnP messages.
Windows Firewall: Prohibit notifications
This disables the notification from firewall to user
Windows Firewall: Allow logging
This enable recordings of incoming traffic information
Windows Firewall: Prohibit unicast response to multicast or broadcast requests
This prohibits the response to unicast, multicast and broadcast messages.
Windows Firewall: Allow local port exceptions
This gives opportunity for administrator to allow local ports in PCs. Sometime the need special ports open.
With all above options I am planning to go with following settings
|
Rule |
Settings |
|
Windows Firewall: Protect all network connections |
Enabled |
|
Windows Firewall: Define inbound program exceptions |
Enabled and configure with adding the programs that need exceptions |
|
Windows Firewall: Allow local program exceptions |
Enabled |
|
Windows Firewall: Allow inbound remote administration exception |
Disabled |
|
Windows Firewall: Allow inbound file and print sharing exception |
Enabled |
|
Windows Firewall: Allow local port exceptions |
Enabled |
Control Windows Update Settings
In network to keep the system secure it’s important that all the system runs with latest updates and bug fixes. Sometimes users in network adjusting these update settings or some time they even disable it. So controlling it from server end using group policy can prevent such activities and run whole domain under one update policy. In here my idea is to use WSUS server that downloads updates and all other pc plan to configure to get updates from that server.
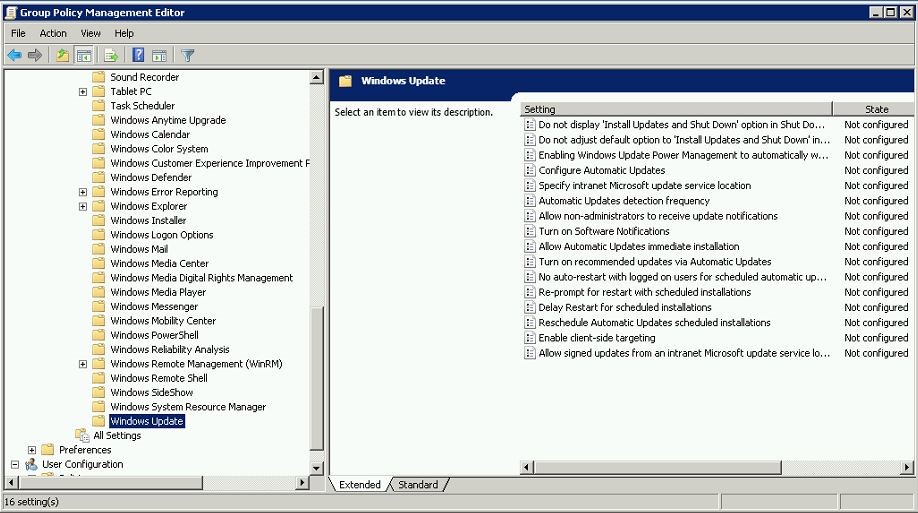
To open up group policy setting first need to load up group policy mmc then Computer Configurations > Policies > Administrative Templates > Windows Components > Windows update
Let’s see what these rules doing
Install Updates and Shut Down' option is displayed in the Shut Down Windows dialog box
Using this rule can control the install update and shutdown option when you go to shut down the pc.
Install Updates and Shut Down' option is allowed to be the default choice in the Shut Down Windows dialog
In this rule can configure that install update and shutdown option to be the default choice in shutdown dialog box.
Configure Automatic Updates
This is the main rule that can configure the automatic updates settings running on computer. In here can define when to check for updates and whether it need to be installed as soon as downloaded or not. This is similar to settings that we can chose in windows update configuration in any computer.
Specify intranet Microsoft Update service location
This is important that environment that use Microsoft WSUS server to do updates on network. In this rule can define the access url of that WSUS server to download updates.
Enable Client side Targeting
This is also applying to intranet update services. In here when configure this it will check WSUS server and see what group this pc is relates and pass the relevant updates.
Reschedule Automatic Updates Scheduled installations
Specifies the amount of time for Automatic Updates to wait, following system startup, before proceeding with a scheduled installation that was missed previously.
No auto-restart for scheduled Automatic Updates installation
Using this rule can prevent automatic system restart after windows updates.
Automatic Updates Detection Frequency
This rule defines how long have to wait before check for available updates.
Delay Restart for Scheduled installation
Using this rule can define how long it should wait after installing updates to restart.
Re-Prompt for restart with Scheduled installation
Specifies the amount of time for Automatic Updates to wait before prompting again with a scheduled restart.
Allow non-administrators to receive update notifications
This policy allows non-administrators to receive the updates based on the policy configured before installations.
Based on those rules I like to go with following configuration
|
Rule |
Settings |
|
Configure Automatic Updates |
Enabled and set to check and install update in every day at 12 pm |
|
Specify intranet Microsoft Update service location |
Enabled and define the intranet server location |
|
Allow Automatic Updates immediate Installation |
Enabled |
|
Re-Prompt for restart with Scheduled installation
|
Enabled and configured it to remind in every 4 hour time |
Prevent Software installation on user side
It’s important to prevent users in network installing applications on PCs. Because it can cause system issues, security issues for the organization. With preventing installations users have to contact administrator to do any software installation and they will review it and permit for the installation or install it them self.
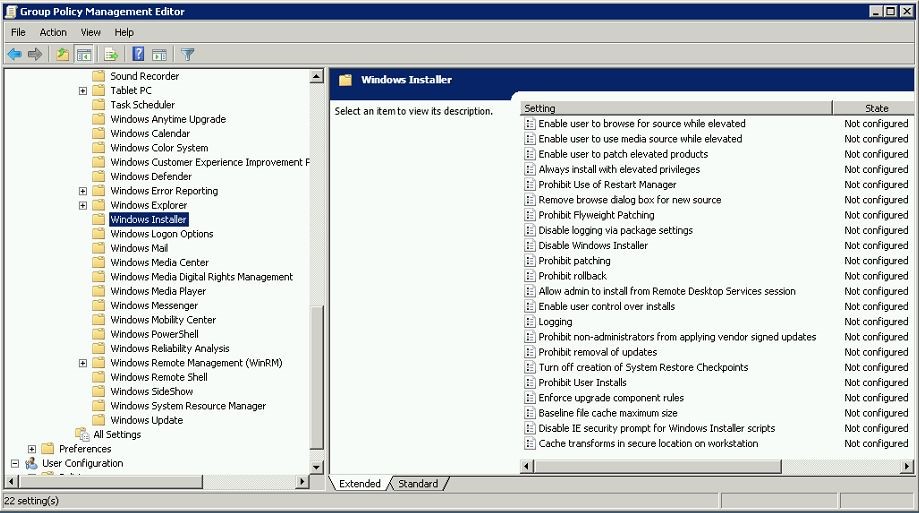
To go in to this group policy setting you have to load group policy mmc and then Computer Configuration > Policies > Administrative Templates > Windows Components > Windows Installer
In this list I will take few of them that we will need mostly configuring the policies.
Disable Windows Installer
This rule can use to disabled using windows installer to install any kind of applications.
Always install with elevated privileges
It will let windows installer to use system permissions always when it try to install application.
Prohibit Patching
This prohibits installing software patches using windows installer.
Disable IE Security prompt for Windows installer scripts
This rule will allow windows installer to install scripts from IE without prompting to user.
Allow Admin to install from terminal server session
This allow terminals service administrator to install the application by login remotely. This is important rule for support.
Logging
This rule defines what type of events it should log in event viewer during use of windows installer.
Prohibit removal of updates
This rule will prevent users with removing updates related to windows installer.
Based on above rules I have come up with following rule set for the network
|
Rule |
Settings |
|
Disable Windows Installer |
Enabled |
|
Prohibit Patching |
Enabled |
|
Allow Admin to install from terminal server session |
Enabled |
|
Prohibit removal of updates |
Enabled |
|
Logging |
Enabled |
Now we have built up the sample common policy which will apply for the entire network. But in parent-child domain environment by default child ( sub ) domain will not apply its parent’s GPOs. There is reason for that. Some time by the design, child domains may be in different geographical locations which connect with the parent domain using slow links. There for it gives opportunity to administrator to decide how to apply policies to child domains.
There is few ways we can apply this.
1) Backup GPOs created on parent domain and then import it to child domain. This way there will not be any traffic comes from child domain to parent domain to get GPO settings
2) Link the GPO in parent domain to the child domain. This will help to have up to date settings among entire network. But this will only beneficial where do not have slow connection links between parent and child domains.
According to the given scenario we can go for the option 2 which will link policies created on parent domain in to child domain. Child domains connect with parent with high speed LAN links so there want be issue with bandwidth usage.
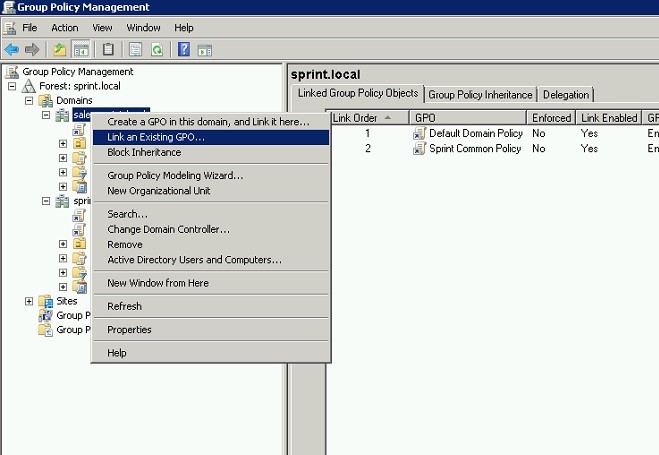
To do that in group policy management window right click on the “sales.sprint.local” tree and click on “link an existing GPO”.
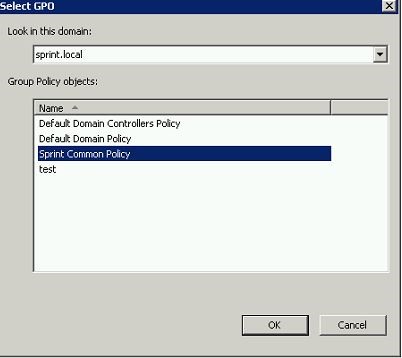
Then it will open new pop up and there from “look in this domain:” drop down select “sprint.local” and in group policy objects select “Sprint Common Policy”, then click ok to continue.
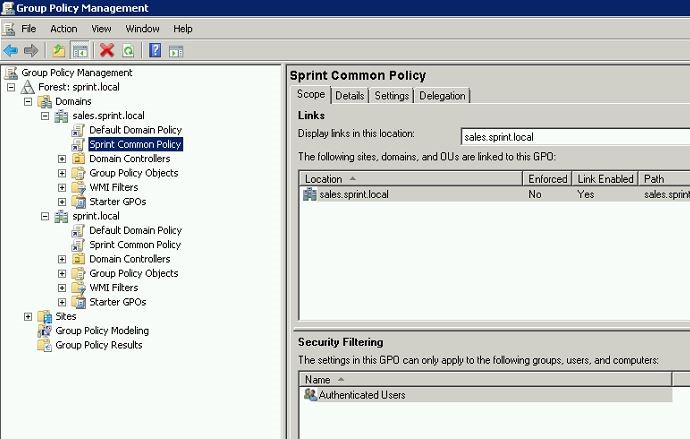
Then in group policy management windows you can see it’s linked properly under child domain too.





Very helpful description..thank you so much